
What can be used in place of plastic wrap in the kitchen???
We’ve had this discussion several times with readers and facebook fans. Finally (thanks to a facebook friend Barry F!), I learned about a simple way to make a reusable food wrap to replace plastic wrap and waxed paper.
We have been using reusable cloth bags for a while now – a great replacement for zip-top plastic bags. But until now, I still had not found a way to completely eliminate plastic wrap or waxed paper from our arsenal of wasteful kitchen products. Inspired by this blog post about DIY beeswax food wrap, I decided I needed to hurry and give it a shot in case it was the kitchen miracle I had been looking for.
Well, it may not be a miracle, but I can already see the awesome potential this plastic alternative has. Read on – I know you’ll be inspired to make your own!
DIY reusable food wrap
Things you’ll need
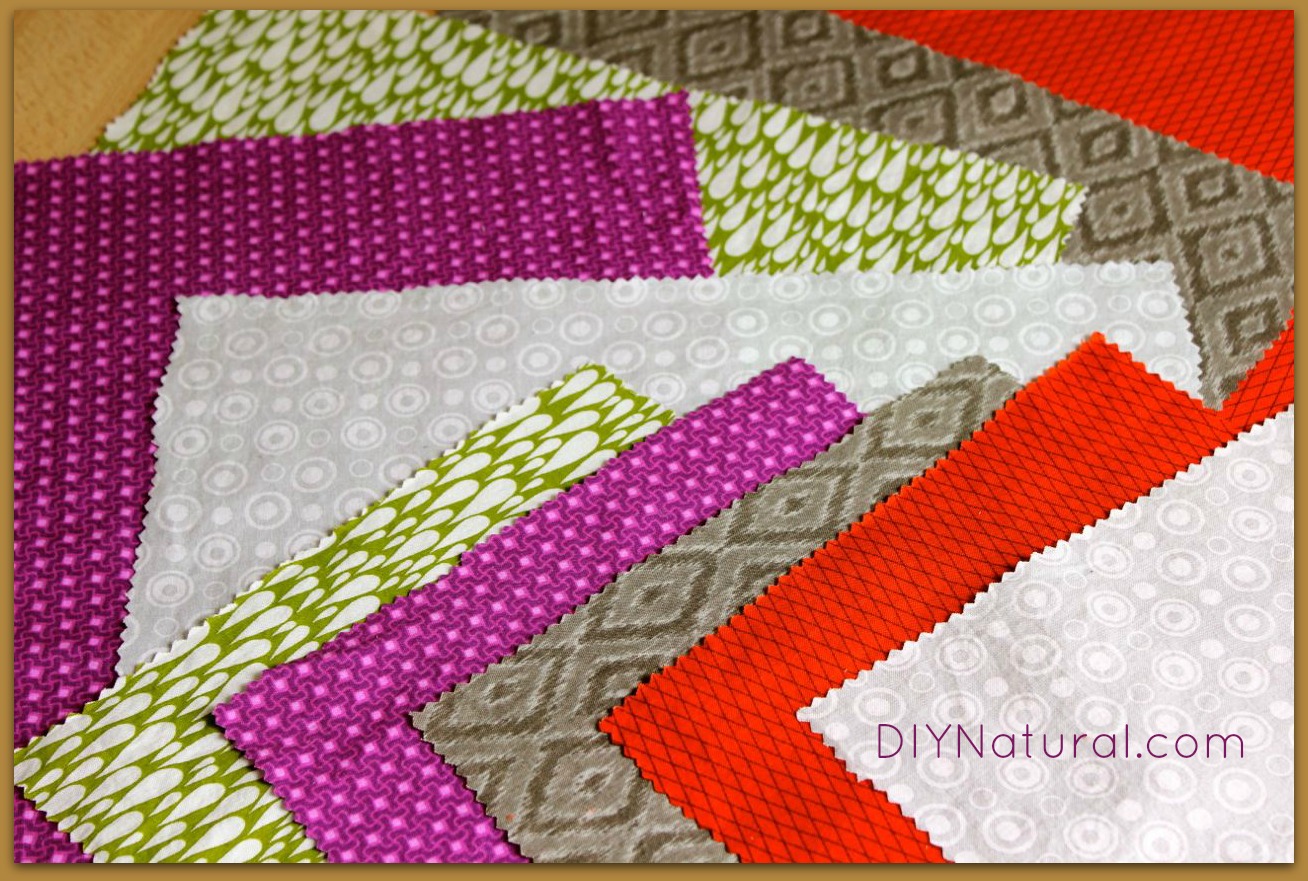
- cotton material
- pinking shears (find these here)
- parchment paper (large roll, 15″ wide, works best) (find it here)
- beeswax beads or pellets, find them online here or here – (I found very fine white beeswax beads in the bulk section at my local health food store. Yellow beads will discolor light fabrics, but are more unrefined and probably healthier to use for this project. You can also use grated beeswax with great results.)
- iron (find one here if you don’t have one)
- large cutting board (or other flat surface covered with newspaper or drop cloth) (find one here)
Step 1
Wash and dry fabric. Using pinking shears to reduce fraying, cut several squares from your cotton material. I cut several different sizes – some large enough to cover large pans, and others to wrap small food items.
Step 2
Choose a large flat work surface and make sure to cover it with something that can withstand heat. (I used an old giant cutting board.) Tear off two equally-sized sheets of parchment paper, both bigger than your largest pre-cut cloth square. Tape one piece of parchment to your work surface.
Step 3
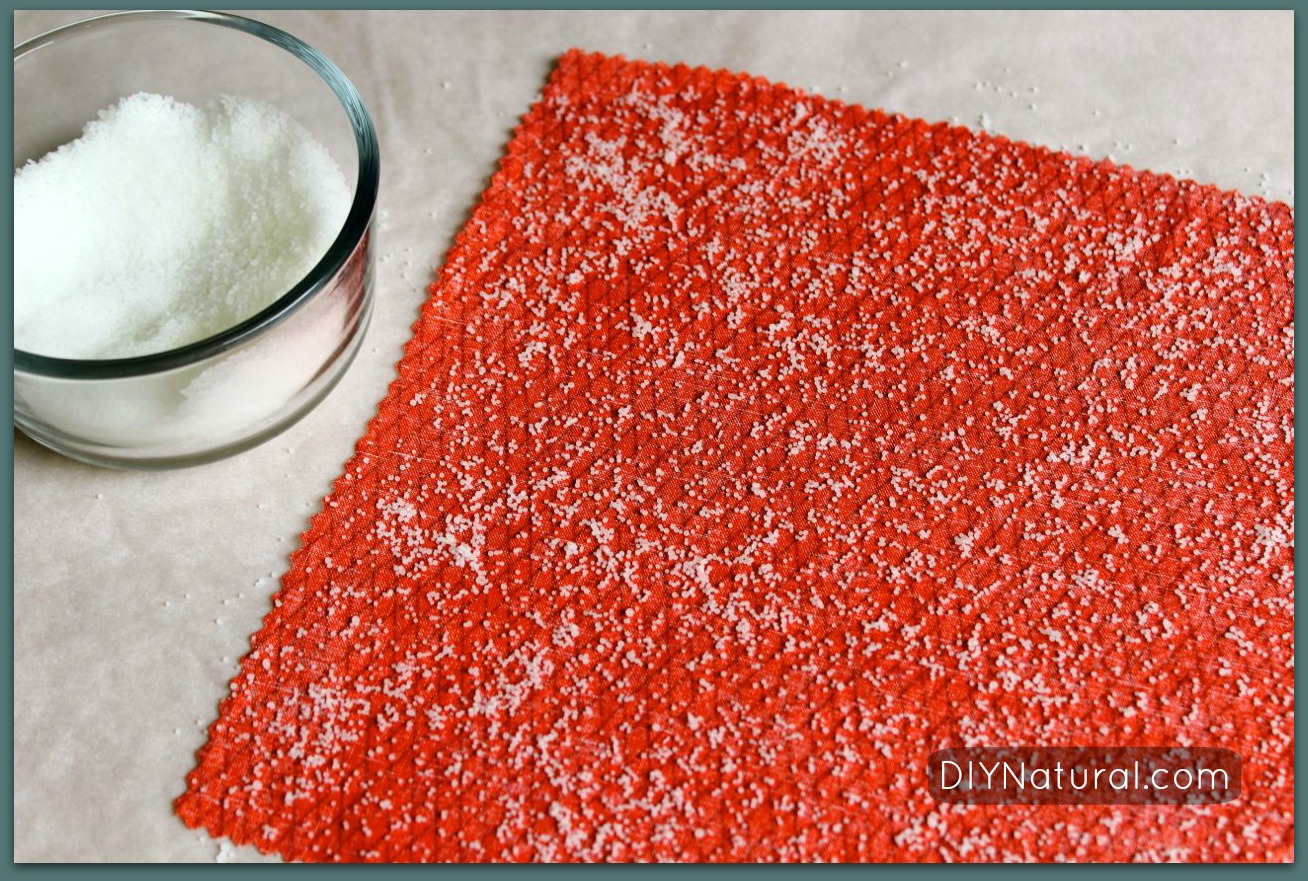
Place one pre-cut cloth square on top of your taped-down parchment paper. Sprinkle beeswax beads evenly over cloth square, making sure to cover all the way to edges.
Step 4
Place second sheet of parchment paper over the top. With a hot iron (I used the cotton setting), gently iron over the top of the parchment paper, going back and forth a few times. (You may want to make a mark on the underside of your top sheet of parchment paper – the side that comes into contact with the wax. This will prevent you from ironing on the waxy side and getting gunk on your iron.)
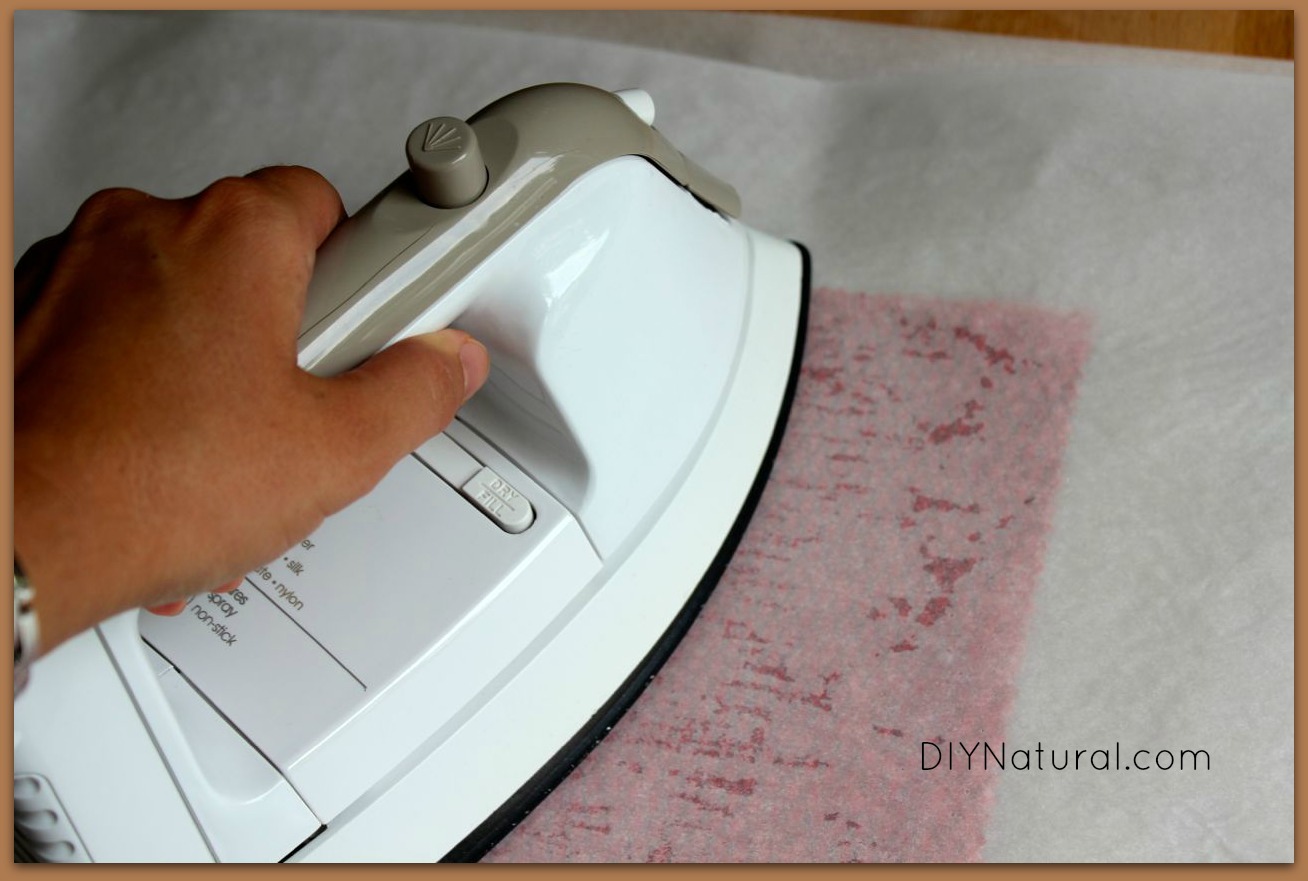
Note: Alternatively, you can use the oven instead of an iron to make your reusable food wrap. I didn’t want to turn my oven on in the summertime to individually bake 16 squares of fabric – but feel free if you would prefer this method. Use the suggestions in this article as a guideline.
Step 5
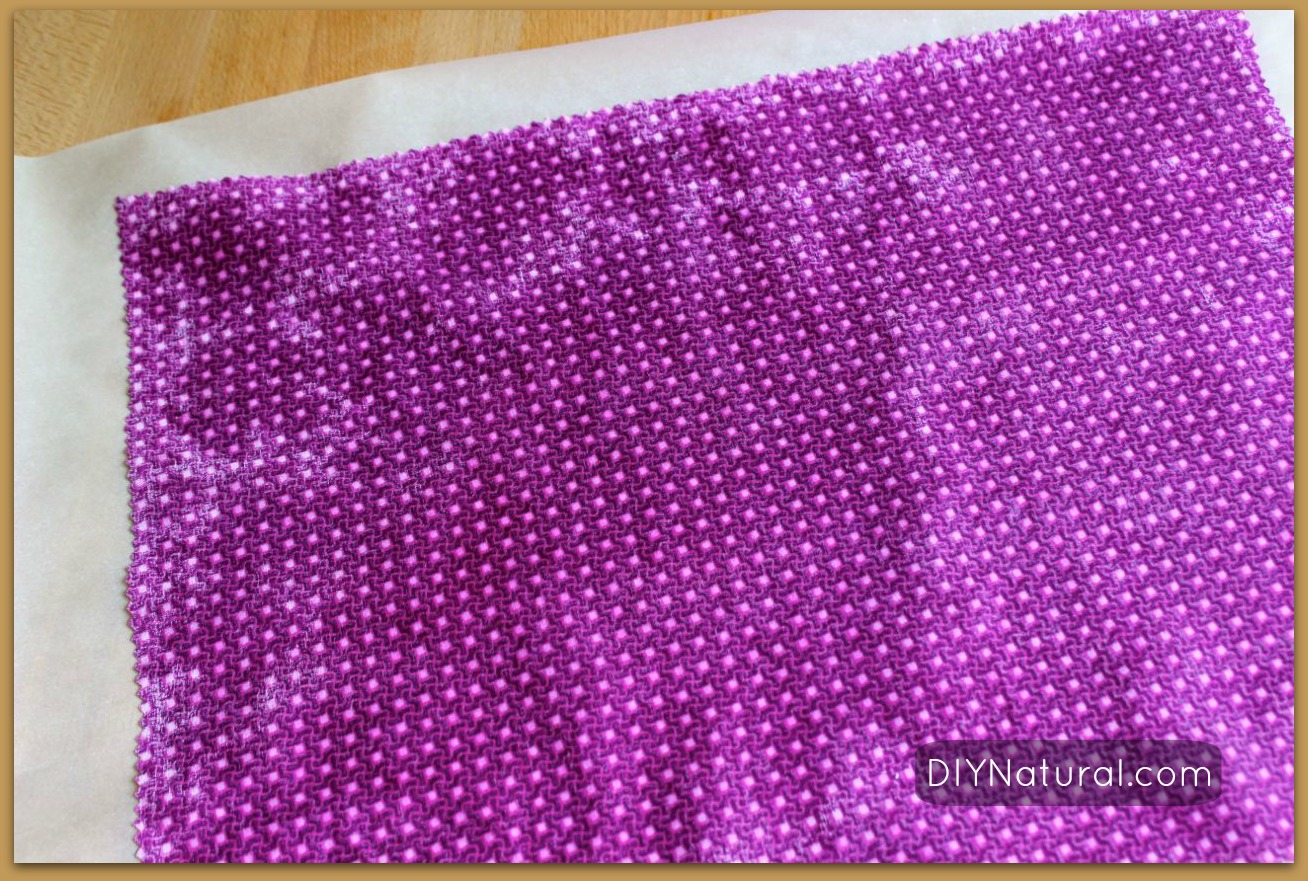
Remove the top sheet of parchment paper and inspect your work. Areas that did not get enough beeswax will be lighter in color. (Notice the lighter areas on the purple fabric in the picture below.) Simply sprinkle a small amount of wax on those areas, cover with parchment paper, and iron again. If your cloth has too much wax on it, you can put another piece of fabric on top, place parchment over both of them, and iron gently. The top piece of fabric will soak up some of the wax. Note: Having too much wax is better than not having enough. Using too little wax will allow your food wrap to leak when wrapping juicy foods.
Step 6
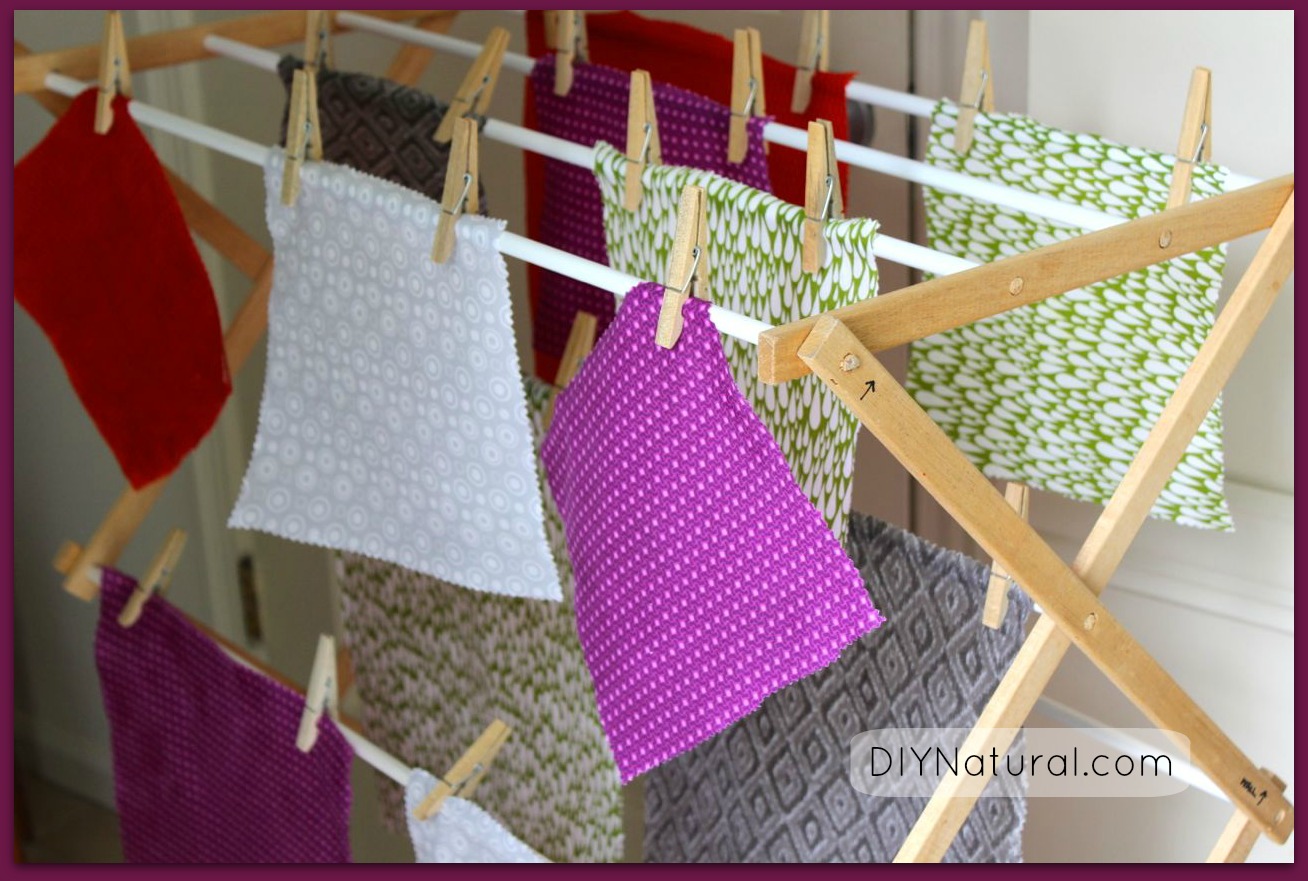
Carefully remove the hot fabric from your work surface and hang to dry. Fabric will stiffen as it dries.
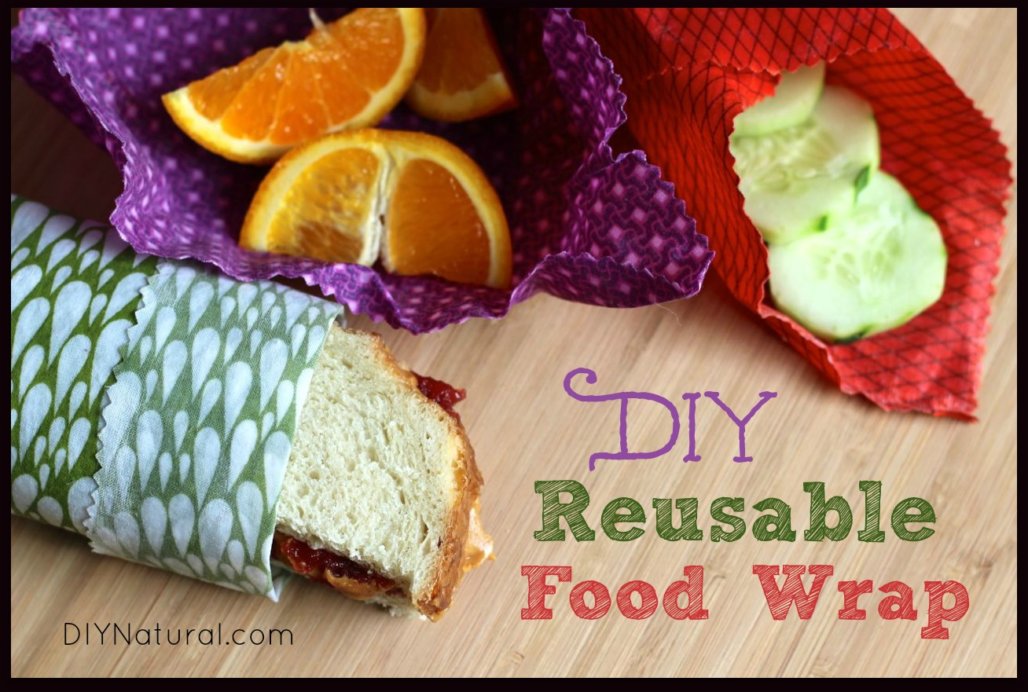
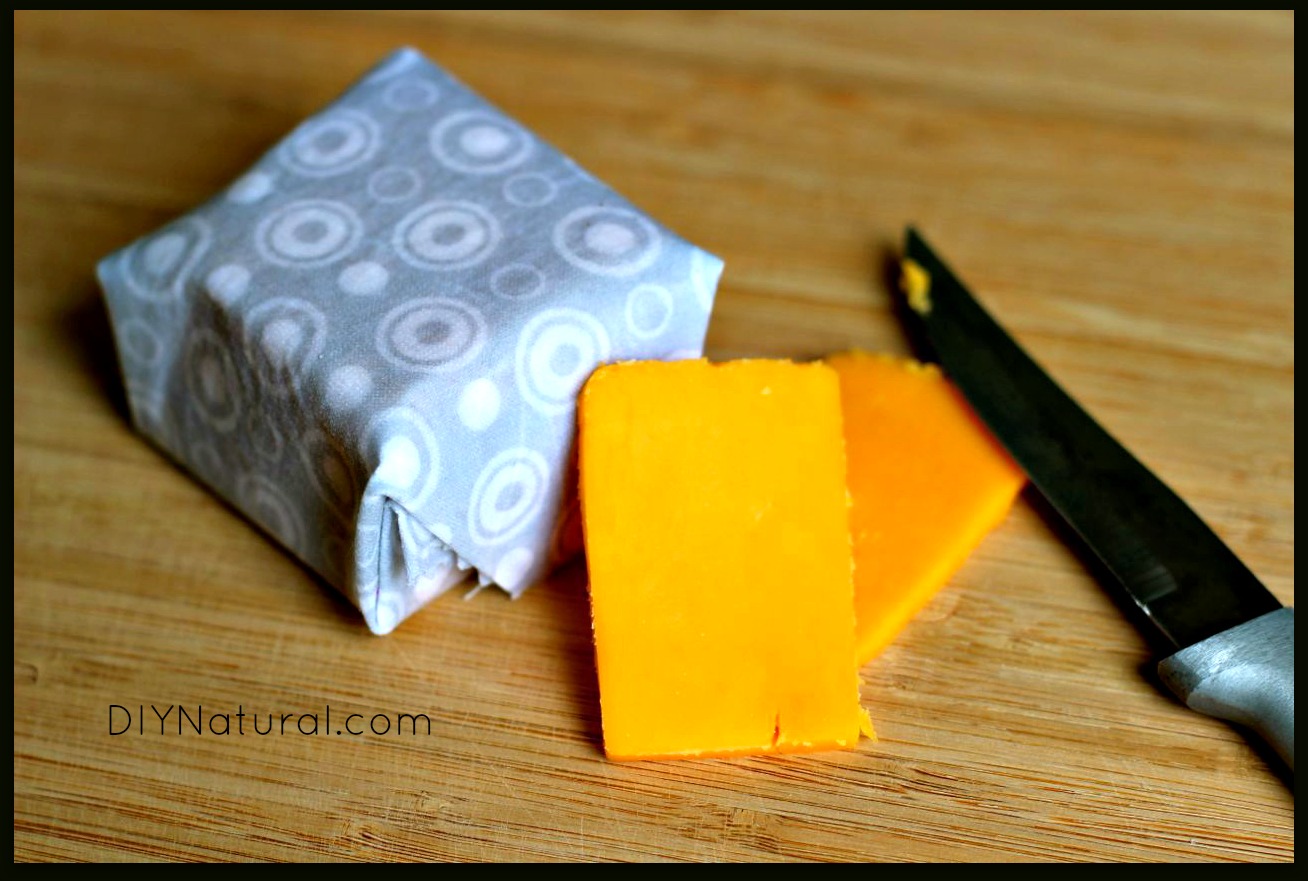
Go ahead and use your new reusable food wrap once it is cooled and dry! You can cover pans/casserole dishes with it, or wrap your food tightly in it. I love to wrap my blocks of cheese, folding the food wrap as if I am wrapping a gift. See how nicely it holds its shape?
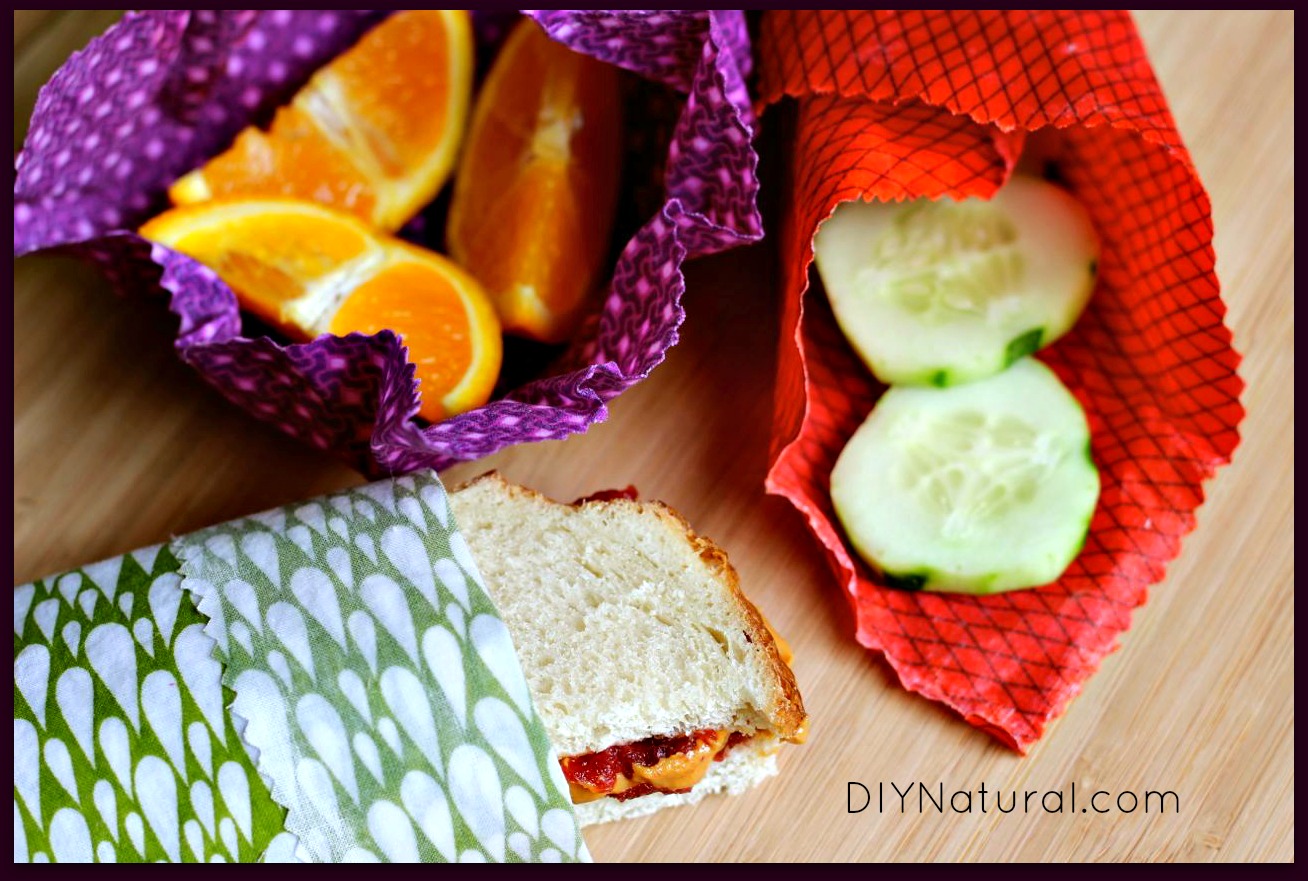
As an added bonus, when you wrap food for school lunches or picnics, this beeswax food wrap doubles as a placemat! Then family members can simply fold it up into a tight square and return it home to be washed and reused.
Caring for your reusable food wrap & other considerations
After use, hand wash your food wrap with cool water and homemade dish soap (or another mild dish soap). Avoid using hot water so the wax doesn’t melt. Allow to air dry on a dish rack. Smooth flat with your hands and store.
You can add more wax (using the above method) once your food wrap is looking worn out and is no longer keeping its shape.
We have found after using this food wrap that it is not completely waterproof or airtight. It does a wonderful job covering casseroles and baked goodies, or wrapping items such as cheese, veggies, sandwiches, cookies, and many other food items. It is not meant for extremely wet or juicy foods, as there will be some leakage in these cases. It works best for short term food storage (less than a few days) and for packing lunches. Because it’s somewhat breathable, your food will not retain moisture if used for long term storage.
What’s the point of making your own?
So if you’re reading this tutorial and wondering why in the sam hill you should try this project, consider these reasons:
- Reusable food wrap is a more sustainable option, preventing toxic plastics from having to be produced.
- It can be washed and reused many times, creating less waste.
- It’s healthier for you to wrap your food in this beeswax fabric rather than having plastic wrapped around your food.
- You’ll save money if you use reusable food wrap instead of purchasing commercial food wrap.
Have you tried something similar to this? What do you like most about the idea?
*******


Would a vegan wax work too?
Katie – I’m sure a vegan wax would work, although I have not tried it myself.
This may be silly but…….which side is the inside? Like does the food touch the fabric side or the wax side? Thx!
Not a silly question Lisa! The beeswax melts through the entire fabric, so really both sides end up being a wax side. However, since I’m a little OCD, I melted the wax on the unprinted side of the fabric, and use this as the inside of the wrap.
HI. I like them and they are so pretty. I want to mention another method for applying the wax. You can melt the wax by putting it in a heat proof container (such as a half pint, wide mouth jar) in a pan of water over low heat, then Paint the wax onto the fabric with a suitable brush. This is one way to do batik. The wax will be heavy but not too bad and excess can be ironed out between sheets of newspaper or packing paper. You could iron out several at a time. This method quickly and easily saturates the fabric completely. I was also thinking of drawstring rounds and bags. The rounds would be good place mats also.
Karen – that sounds like a great technique! And I also love the idea of some rounds. Guess I’ll be making some more! 😉
I just tried the iron method from your post – it works MUCH better than in the oven. I use bees wax pastilles from Mountain Rose Herbs which can be tricky for oven method. The iron method lets me control both melt rate and spread of wax easily. I reuse my parchment. I love these wraps. My first test was wrapping a cut yellow onion for several days – no odor leak or residual smell on wax. Thanks for posting this 🙂
I’m glad you loved this method Marilyn! The onion test is the ultimate! Thanks so much for returning to share with everyone. 🙂
I have been making reuseable food wraps and snack bags for a few years now using PUL. I line the PUL with hemp jersey. That way, even though the polyurethane is supposed to be food safe, my food is not sitting directly on the PUL. I seal them with velcro. I was selling them until I received a Cease and Desist Order from the Wrap N Mat Company. I still make and use them myself. I also make bowl covers out of the PUL fabric.
Kathi I would be interested in hearing more about selling your food wraps. I am a quilter with a shop on ETSY would like to sell these. Please email me so that we can talk about this.
I would be interested in seeing what you make also! 🙂
What a great idea! I just bought two packs (3 in each) of cheap reusable sandwich baggies from the Target Dollar Aisle, but they feel like they’ll fall apart in the first wash and stink so strongly of plastic that I don’t want to use them without washing first! Guess that’s what I get for being soo cheap;) I’m thinking that those with a good food processor could grate their chunks of beeswax or pellets even finer for more even dispersal over the fabric. Love your fabric choices, especially the green teardrop one. Where did you find them?
I hate to say this, because I normally boycott WalMart, but yes, I found my fabric at WalMart. 🙂 They were small pieces of pre-cut fabric for quilting.
Also, at work we have shower caps for free, so i often take some home to use to cover bowls etc. in the fridge. This would be way better with your fabric idea. If I had a sewing machine, I’d make round ones and sew elastic around the edges.
I absolutely love this idea! Not sure if anyone mentioned it, but if you prefer you can also buy a round of beeswax and rub it into the fabric. After that you’d simply blow dry it. That would eliminate the need for the parchment paper and you can get chunks of the wax pretty easily. Overall wonderful idea! Kudos!
That sounds like a great alternative to ironing! Thanks for the tip Victoria!
This is such a great solution to a problem I’ve been trying to solve for awhile now. I especially love the idea of wrapping my cheeses from the cheese counter in it. I try to buy things with little to no packaging, but the plastic cheese wrapping has always stumped me. I’m excited to try these! Where is a good place to find the beeswax beads? Thanks for the tip!
Yeah, it works great for cheese as long as it’s just short term storage (as stated in the article). I have found that it allows the cheese to get hard if storing for a week or more. Information on the best places to find the beeswax beads is under the “Things You’ll Need” section in the article. Have fun making these!
Did you put beeswax on both sides of the fabric? If not, Which side did you wax? The printed side or the reverse? Is the beeswax side the side touching the food?
When heated, the beeswax soaks through the fabric, coating the whole thing. I did sprinkle the beeswax on the non-printed side of the fabric, although I don’t think it matters which side.
The best way for storing cheese is to place an absorbent cloth (uncoated natural fiber) lightly moistened with vinegar on a plate, put the cheese on this and cover with an upsidedown bowl that fits over the cheese (or buy a cheese dome.) The vinegar keeps the cheese from drying out and also from developing that ammonia smell. You can also wrap the cheese in the vinegar cloth if your dome doesn’t fit well enough to keep it from drying out. Cheap white vinegar works as good as anything and you can use it clean your house!
How do these get clean when washing with cold water? Wouldn’t there be lots of bacteria left on them growing without being able to use hot water? Also, what about stuff like the PB&J in the picture? The oily nut butter seems like it would be impossible to get off without hot water. The conce[t seems really cool, but I can’t figure out how to use it more than once (which of course defeats the purpose) cleanly. Thanks!!
Good question Lori! Do you ever wash laundry in cold water? Same concept. Just be sure to use soap when hand washing these to wash off bacteria. They actually come clean very well. I have had pizza sauce stain one of mine, but things like pb&j surprisingly wash off nicely.
i love DIY tutorials and this one looks pretty straight forward , but i have a question…what about bacteria that gets in the wax and through the cracks to the fabric?
even hand washing would eventually create cracks.i might use this for crackers or bread- maybe some veggies and fruit, but i would hesitate to do sandwiches w/ meats , mayo ,etc.
Everything wears out eventually, so if you have experience with this please share so all can benefit.
This is a fantastic idea, but most of the plastic wrap/bags I use are when freezing stuff. Have you tried freezing this? I imagine the wax wouldn’t fare so well, but would be interested in your wisdom on it! Thanks 🙂
I use jars to freeze items at the moment because I can’t figure out the best system. I’m thinking the wax would crack and since they aren’t air tight, you’d get freezer burned food.
Kristy is correct…these wraps are breathable, so your food will not freeze well in them.
Are these mircowave safe? I can’t wait to make these!
This would not be microwave safe. Fabric could catch fire and the wax melts. Maybe a silicone placemat could be used over bowls in the microwave? It’s definitely microwave safe and reusable.
Keep in mind these should never be used for hot foods or in a microwave. This is the reason I recommend hand washing in cool water so the wax will not melt off the fabric.
Could you use grated beeswax? I have a ton of solid beeswax right now so would love to save some $$ 🙂 I have to laugh as I just told my hubby not to throw out good material (ie pj pants this morn) because I could always use it! Now I know what they will be turned into. Thanks so much!
Absolutely! Grated beeswax would also work. You should definitely make some of these out of your hubby’s pj pants and see if he realizes what his next sandwich is wrapped in…lol! 🙂
Love this! Can you reuse the parchment after ironing the wax on once?
Are there any issues with dye from the fabrics getting into food?
Yes, I used the same piece of parchment paper on top for my entire project. I did have to replace the bottom piece because it got a little gunked up with wax and was curling so much that it wouldn’t stay put even with tape. So far we’ve had no issues with dye from the fabrics getting into food. I suppose you could wash your fabric in hot water before making these to pull some of it out if this concerns you, or just use non-dyed fabrics.
Cool! I might have to try this!
Both this and the reusable bags sound absolutely wonderful. Even if we still need to use a ziploc occasionally for the especially messy stuff…It is still such a wonderful concept. Duh?! Right!! 🙂 I’m the big culprit, too, as I’m the one who must take a lunch everyday. I try to use reusable bowls, etc…but sometimes you just need a baggie…Love the site..thanks for the post!!
I love this idea. A few concerns though, I would be hesitant of using the iron on vinyl because of its possible toxicity. Also, it wouldn’t work in a picnic sac on a hot day as the beeswax may melt. Do you know the temperature at which the beeswax melts? I’m just concerned about the hot Texas sun. Also, would it be better to use organic fabric? Other than that, I’m looking forward to trying this out, (I’m too frugal to buy the pre-made ones) and I want to get rid of the ziplocs.
The tutorial doesn’t call for vinyl so you’re good there. Let us know how it works out for you Nikki.
Oh my gosh I love this! I would love to eliminate all the extra spending that goes into buying plastic wrap and ziplock bags. This is fantastic. Thank you, thank you for the awesome idea.
I have struggled with the plastic wrap dilemma for years now. I like the idea Courtney, of using jars to store food. I like this idea but do have some questions. How do you wrap food items tight enough so that air doesn’t dry food out? Does anyone worry about the fabric dye getting into the food? What is everyone doing to cover food in the microwave?
I never understood those that bought food in glass containers, then threw them out when they were empty. THEN…would go out and BUY glass containers to store their leftover food in…… I have always saved glass containers and their lids for so many different uses. I can freeze things in them, use them in the fridge, microwave in them, store on food on shelves, etc. I use some for my craft supplies, some for things like bird feeders, growing organic or heirloom plants in, etc…
We have great luck storing food in glass containers in the refrigerator, and food retains its moisture. We haven’t had issues with the fabric dye getting into food. If this worries you, you could use a natural-colored (non-dyed) fabric without a pattern. We don’t use a microwave, so maybe someone else can chime in here to help you on the microwave dilemma??
why not just use wax paper to iron onto the fabric if you already have it on hand?
Not sure I understand the question… Do you mean use it to transfer the wax from the waxed paper onto the fabric? Or use waxed paper in place of the parchment paper in the instructions?
I haven’t yet ordered pre-made beeswax wraps because of the cost, and I haven’t yet tried making them, because other tutorials seemed to be more complicated. I really like this idea. The only issue I have is that I need to freeze individual portions of brownies, etc. But I’m thinking that I could perhaps wrap the food in a beeswax wrap, then put plastic wrap around it. THat way there’s no plastic touching the food, and I since there’s no food touching the plastic, it should be very easy to reause it.
I can’t wait to try this. There are so many benefits. Environmental, health and cost. I’ve employed many of your DIY ideas and love them all. Makes me feel good that I’m helping my family and the earth. Thanks!
This is so cool! Thanks so much Betsy, for this idea. Working part-time at a fabric store gives me a chance to look at the fabrics. There’s always remnants of cotton and in so many colors and patterns. I’m going to make some of these today and get some of the iron-on vinyl as soon as I work next time!
I bet you’ll have some really neat ones with all the fabric choices you have! 🙂 Enjoy this project Debra!
We’re glad you found our post inspirational! Your wraps turned out beautifully – We like the oven method here in our cold climate, and the only other benefit of heating the wax that way is the lack of mess and risk to the iron; you’ve certainly got the iron method sorted our nicely, though, so that there’s no fuss!
I think it would be quite simple to stitch a bag up once the fabric has been coated, but you might not find it necessary – This stuff really holds its shape well, and you can always replenish the wax on flat sheets to keep them in use for a long, long time (you’d trade that benefit to get the pros of a stitched bag).
Best,
Rebecca at TrashBackwards
Yes, I loved your post and found it very helpful when trying to make my own! You have a great point about stitching the fabric…it would make it difficult to add more beeswax when needed.
Could you melt the wax on the fabric, then stitch it up to be more of a bag shape?
Just a thought….
That exactly what I was thinking. We currently use jam jars, mason jars we get our honey in, and other reusable storage containers, over baggies and plastic wrap, 99% of the time. But for some things, little snack bags made like this would be great! maybe make them with velcro closures?
I’ve made “material” zip locks for years…I use velcro for the closures which work wonderfully…
Definitely! Having a nice little pocket would be so handy! You can even sew on buttons, snaps, velcro, or whatever you want.
Love, love, LOVE this!! What a fantastic idea 🙂
I have tried this using the oven method. I like your method better. I need to try again. The first time I made these and used them to wrap a block of cheese, I felt like the wrap didn’t keep the cheese fresh – maybe not enough beeswax or I didn’t wrap tight enough.
Yeah, I think this method is probably easier than the oven method. Give it another shot when you’re feeling in the project mood! 🙂
I sew my own cloth baggies and sandwich wraps – most times I just use cloth (with or without PUL) because I don’t like hand-washing but sometimes I use iron-on vinyl for the food that is wet or leaky. I have some beeswax and I think this might be worth trying 🙂
You sound very handy and talented Becca! I never even knew iron-on vinyl existed – that would make an awesome food wrap!
Iron-on vinyl can be found at Jo-Ann Fabrics for about $16 for a 17″x2 yard roll. I don’t how food safe that is though. Any thoughts on dipping fabric in melted beeswax (perhaps after candle making). Also, how do you store your fabric squares after washing?
I think if you dipped fabric in beeswax it would end up very thick…too thick to be pliable. I store my food wrap flat (some of the large ones have to be folded) in a kitchen drawer.
I cannot wait to make these! I have leftover fabric and can’t wait to make my son black flamed sandwich wraps for school. 🙂 Have you SEEN the ridiculous price of “green” sandwich wraps? These will cost pennies in comparison!
Oh, the black flamed food wrap sounds AWESOME for a boy! Yes, the prices are insane for eco-friendly sandwich wraps these days…these are a great alternative. You can even stitch edges together or add buttons/snaps/velcro if you want to get really fancy. 🙂