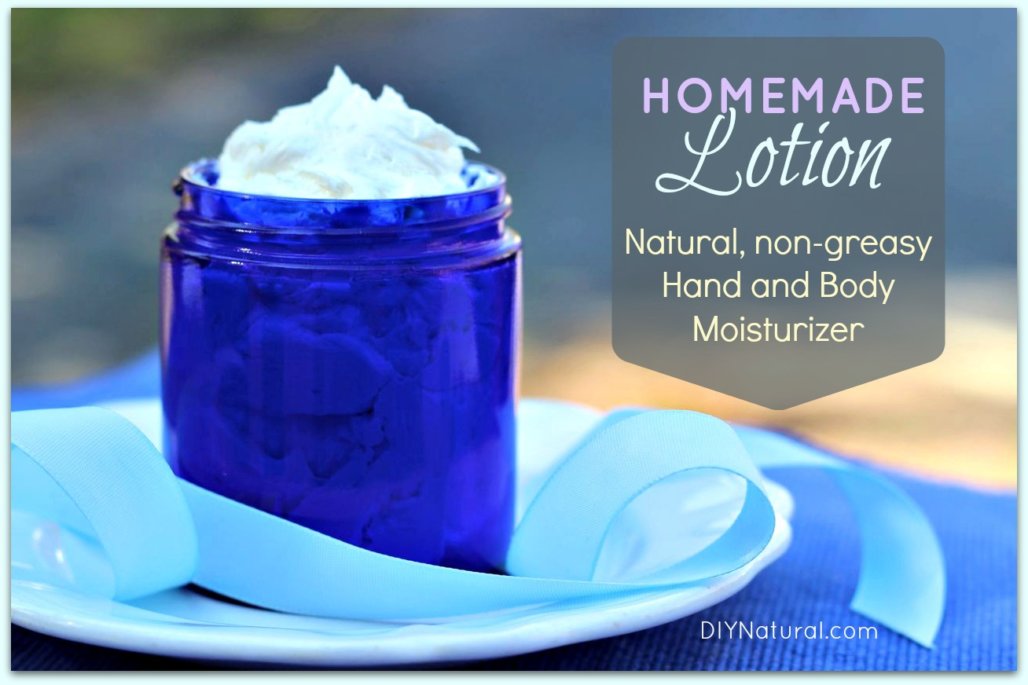
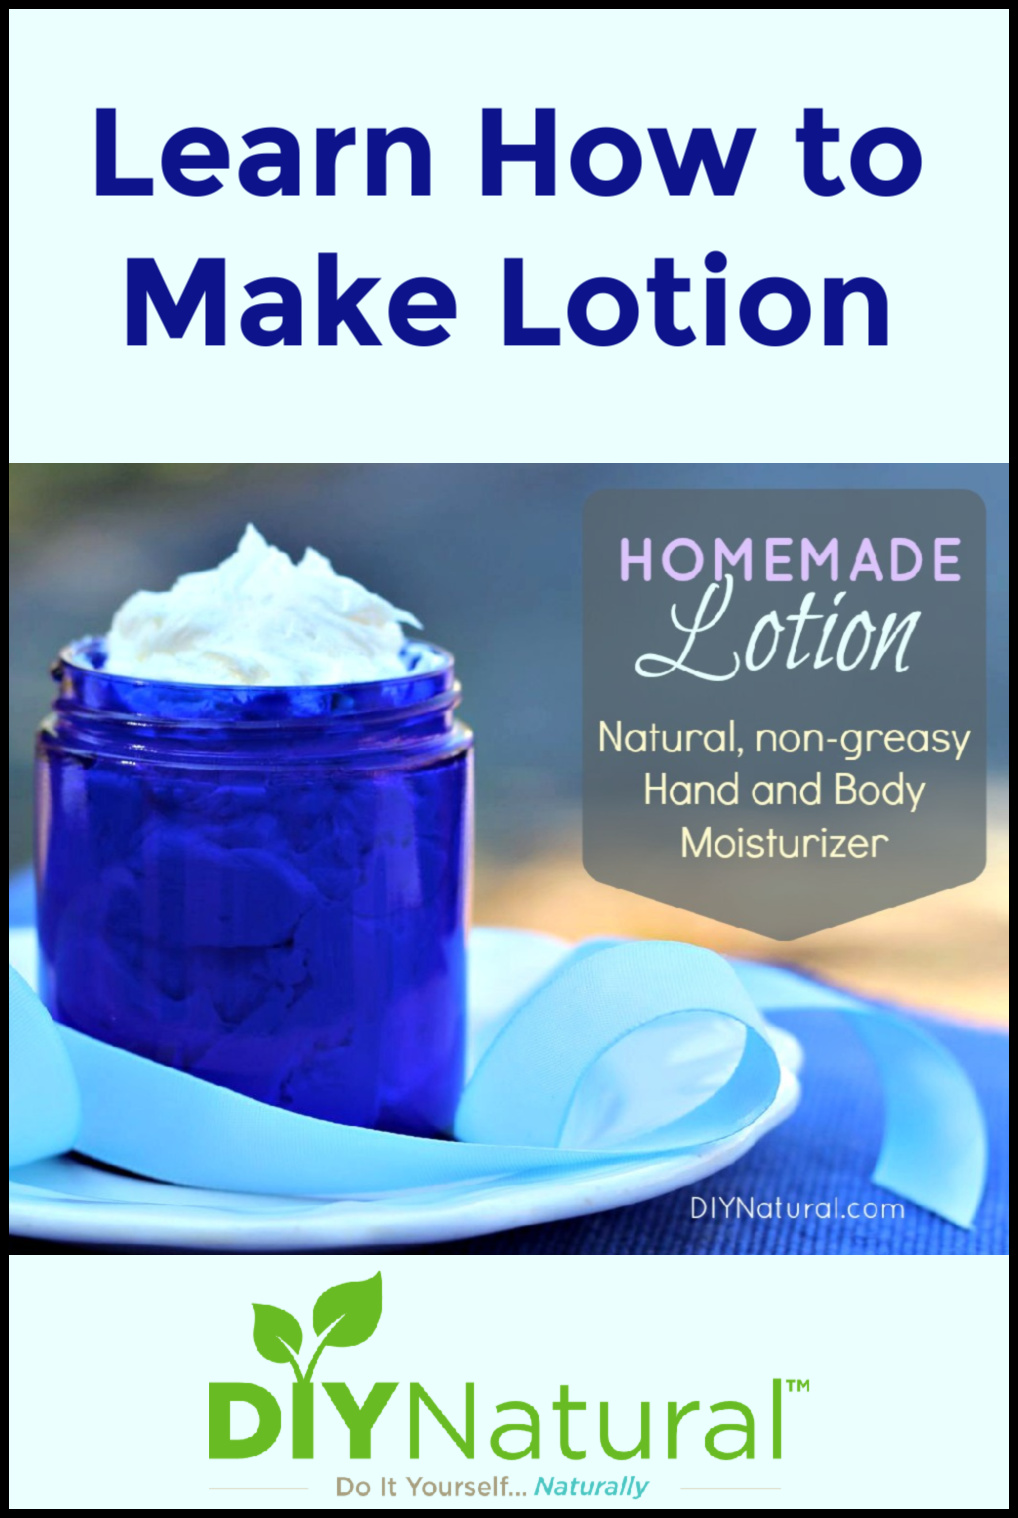
Learn how to make lotion with this homemade lotion recipe for hand and body. It yields a light and fluffy moisturizer that repairs dry skin.
Ever since I posted a recipe for a light, non-greasy moisturizing spray, I’ve had countless requests for a heavier, creamy homemade lotion recipe.
Today I’ll finally share my absolute favorite recipe for an all-natural hand and body cream that is light, fluffy, yet extremely moisturizing. The best part, it doesn’t leave your skin greasy like all the popular body butter recipes you find all over the Internet!
This creamy moisturizer will repair your dry skin after a long winter, but it’s light enough to carry you all the way through a hot summer.

Homemade Lotion: A Non-Greasy Moisturizer
Learn how to make lotion with this homemade lotion recipe for hand and body. It yields a light and fluffy moisturizer that repairs dry skin.
- Prep Time
- 15 minutes
- Active Time
- 1 hour
- Total Time
- 1 hour 15 minutes
- Servings
- 16 ounces
- Estimated Cost
- $15
Ingredients
- 1 cup Aloe vera gel
- ½ cup Grated beeswax
- ½ cup Sweet almond oil (or grapeseed or jojoba oil)
- 1 tsp Vitamin E oil
- 15 drops Essential oil
Instructions
-
In a medium-sized bowl combine aloe vera gel, Vitamin E oil, and essential oils. Set aside for later, allowing it to come to room temp. (Sometimes it even helps to set this in a warm water bath to bring it closer to the temperature of the oil/wax mixture you’ll be adding it to. This helps it emulsify.)
-
Add grated beeswax and oil to a glass measuring cup. Place measuring cup in a saucepan of water and bring water to a gentle boil. Heat, stirring occasionally until beeswax is completely melted then carefully remove the measuring cup from the pot.
-
Pour beeswax/oil mixture into a blender and allow to cool. (Move on to step 4 when it has cooled down but is still soft.)
-
Once cooled, turn the blender on LOW. Remove the top of the blender and pour aloe vera mixture in a SLOW, continuous stream.
-
Stop blender as often as needed to run a spatula around sides to incorporate ingredients. If some liquid is pooling at the top, stop frequently to push it around with a spatula. (This step may take as long as 10-15 minutes, and patience is key!) Continue blending until desired consistency is reached. (We use and highly recommend a Vitamix blender.)
-
Transfer moisturizer to clean jars and refrigerate any portion that will not be used up within a few weeks.
Recipe Video
Made this recipe?
Mention @diynatural or tag it #diynatural!
Notes for DIY Lotion Success
- Vitamin E oil is a natural preservative but doesn’t keep indefinitely so use within 2-3 months. I keep a small container of it in the bathroom and refill it from the large jar in the refrigerator. (Although I will say – I conducted an experiment with this cream, and found that it did not change in smell, consistency, or color for almost eight months when kept at room temperature. However, I don’t recommend keeping it around this long, as bacteria can begin to grow in homemade products containing water.)
- I experiment with different essential oil blends in this homemade lotion recipe, you should too. My current favorite is a mixture of lavender, lemon, and eucalyptus.
- It bears repeating that patience is key while blending and waiting for this cream to emulsify. Do not leave the blender unattended. Also, be sure to continuously push any separated liquid around so it reaches the blades. You can add a pinch of borax to the mixture if you’re really having trouble getting it to emulsify. (Find cosmetic-grade borax powder here.)
- This moisturizer can also be made with a stick blender or hand mixer.
Tips for Cleaning after Making Lotion
- After making this homemade lotion, scrape residuals off the blender and utensils before cleaning. Rub this excess into your hands.
- After transferring to the jars, wipe out the blender thoroughly with old rags (a paper towel works too). This prevents oils and beeswax from going down the sink and clogging drains.
- Fill blender halfway with water, add a few drops of dish soap, and blend on high for a few minutes. Add a little sea salt to the blender for scrubbing if needed.
- Clean blender and utensils in hot soapy water.
We hope you enjoy this natural recipe, it has become a favorite in our house.
Let us know what you think about this homemade lotion!
*******

I’ve made this recipe many times and I get beautiful lotion everything. It’s important to let your beeswax oil mixture cool quite a bit before slowly adding the aloe mixture. Also, I use a stick blender. Love love this recipe.
What about using a few drops of rosemary essential oil to preserve it longer? Isn’t rosemary a natural preservative? I thought I read somewhere that it was.
I’ve made this recipe many times, and have used it as a demonstration in the lotion-making classes I teach. I have a few observations to share: First, be sure to use weight as the measurement for the beeswax, and not volume since there is no standard of “grating.” Some of my students contacted me to tell me their recipe failed. When asked how they measured the beeswax, some said it was in granules, others had grated it, others used pastilles, and some just melted it from a big block. Start with 3/4 of an ounce, and increase or decrease as needed. Also, fresh aloe gel makes a lovely lotion but will require refrigeration or preservation. Bottled aloe gel may already have a preservative in it. And lastly, be prepared to use that pinch of borax. 20-Mule-Team will work, but purchasing a cosmetic grade will assure you that it is pure. Without the borax, and if the measurements are even a little bit off, it will produce a sticky, gloppy mess. With the borax, it’s BEAUTIFUL! (and I did have it turn out beautiful one time without the borax, too.) Love these recipes! Keep ’em coming!
Hi,
Would you be open to discussing some observations I’ve made on diynatural.com? I think we can help to drive more traffic to yourwebsite, as well as more sales.
If more sales/clients is what you’d like, just respond here, and I’ll have one of my agents get in touch.
Looking forward to hearing back,
Liv
Betsy, I love your ideas!
Would a liitle squirt of ASAP silver solution keep bacteria from building up in this cream/lotion? Or would it ruin consistency? Because of multiple allergies, ASAP silver solution is my main item in medicine cabinet. It is NOT COLLOIDAL SILVER. I understand that no bacteria can survive where silver is present. I use 22 ppm. Write me and I will tell you where I order it. NASA uses it in space shuttles but they use 33 parts per million. Most people can get by with 10 ppm, if I understand correctly. Just curious if I might make larger batch for gifts, and fear it might last too long and bacteria be a problem.
Dozenelk
.
I tried this twice at great expense to both my wallet and my kitchen appliances. One, the beeswax mixture never incorporated into the aloe mixture, no matter how long I tried to blend it, although a good portion of it ended up on my kitchen floors, walls, and ceiling from spatter. The second time I tried it in a blender and the beeswax mixture hardened almost instantly to the sides, it couldn’t be “scraped”. I couldn’t find anywhere on here if the measurements were dry cup or wet cup, but I’m assuming whatever I used was wrong. I’m just so frustrated with this. I spent over $50 on the ingredients and all I got was a giant mess. What a crap website.
can honey be used in place of beewax?
Do you think this lotion would be thin enough to work in a pump bottle? Or is it pretty thick and best in a jar?
This ends up being a thicker lotion, so best in a jar.
Everyone is right – beeswax is not an emsulsifier, hence why so many people are probably having problems with this recipe splitting. An emulsifying wax is needed. There are many eco cert approved emsulsifying waxes that will give great results. And I agree with the preservative comments by people. I love the addition of aloe as it is wonderfully soothing for skin but this will definitely grow bacteria. A lot of bacteria and moulds will grow, often unseen, even looking safe, negating any of the benefits of the beautiful butters and oils used.
Does Avocado oil works ,too?
Avocado oil would be wonderful in this cream if you want a more intense moisturizer. The oils listed in the recipe are all lighter, and more easily absorbed by skin. Avocado oil may result in a mixture that’s a tad greasy, but still very nice.
Howdy! I’ve read elsewhere that chemically, beeswax is not considered an emulsifier. (Just do a Google search for ‘beeswax emulsifier.) And I’ve also read that fats which remain solid at room temperature (such as shea & cocoa butter) are naturally high in stearic acid, and stearic acid IS an emulsifier. Assuming all of that is true, could I replace the beeswax with shea or cocoa butter and achieve an easier-to-blend, non-greasy DIY lotion? Anybody tried a version of that recipe?
This sounds like a lovely recipe but if I could make just a few suggestions? First,vitamin E is not a preservative,it will however help keep your oils from going rancid as quick. Because of the aloe,water or tea being used in this it really should have a preservative added- I use liquid Germall plus. It only neefs a tiny bit,like .5% of your recipe and then it doesn’t need to be refrigerated. While keeping it refrigerated probably extends the life of the recipe, sometimes germs can grow and we don’t see, smell or feel them but they’re there. Using your fingers to scoop it out to refill another container will cause this to happen even quicker so if you choose not to use a preservative, definitely use a clean spoon or scoop to transfer it. Another thing that may be having an affect on so many problems with it emulsifying is that beeswax isn’t an emulsifier. It can be used with borax to emulsify but even then it’s not always effective. Beeswax is more of a thickener. To make water and oil mix you should use an emulsifying wax, I use e-wax and it works well. I mean no disrespect or meanheartedness by mentioning these things, I’ve just learned the hard way myself what works and what doesn’t always work. Thank you for sharing the recipe though because it is a very nice non greasy lotion
I think the point is that we’re trying to stay away from synthetic and/or artificial ingredients such as Germall and e-wax (read Betsy’s note on e-wax above). Using common sense, clean utensils and jars, and time and temperature (refrigeration for only a few months as Betsy indicated) will keep your moisturizer fresh and safe. I have been making lotions and creams of this type for years, and teaching others how to do so as well, and I’ve never (not even once in hundreds of batches) had any go “bad.” Just treat it with the same care as you would food. After all, you’re nourishing your body–just from the outside! Love your recipes and ideas, Betsy!
I want to add rosehip oil for mine, what do you think of that? I also want to add in mineral oil.
Rosehip oil sounds fabulous for this recipe! I would advise against using mineral oil in anything, as it is a petroleum byproduct. It can have damaging effects on skin, and should be avoided in store-bought products as well. Consider another oil like grapeseed, sweet almond, jojoba, safflower oil, or even olive oil.
Hello! I want to try this recipe!
Can you help me with the quantity in grams please?
I really wanted this to work but when the soft wax hit the room temp aloe it turned to a solid and then separated. I now have a waxy disaster mess. Might have destroyed my Ninja blender cause of all the wax in it.
So disappointed… And will spend the rest of the evening cleaning my mixer ??
I made this using the fresh aloe I had on hand. All of my ingredients were at room temperature and carefully measured. I used an immersion blender, and after 20 minutes, had a gloppy mess. I added a pinch of Borax, and it immediately emulsified. I kept on blending, but instead of a creamy lotion, it was runny. It’s still usable, and I may put it in a pump bottle.
Unfortunately this was a total disaster for me. Nothing worked and I ended up using a lot of equipment to try rectify it and thus ended up with a nightmare of a washing up situation. Totally bummed 🙁
I can not wait to try this. I am allergic to all commercial beauty products even the ones recommended by my dermatologist. She claims she never heard of anyone being allergic to vanicream products before. But vanicream has a long list of nasty ingredients and the lotion just has a consistency I can not stand. I tried lotion bars and find them to oily. I was planning on making soap tomorrow so I’ll make this too.
I’ve just had a look at your recipe and would suggest instead of using a glass measuring cup to use a double boiler instead to melt the beeswax, then add your oil and let cool.
The 2nd suggestion is to obtain airless jars in small sizes like 15ml from cpr packaging (you can order small amounts) and keep one jar for use in the bathroom and the rest in the refrigerator. This will keep your product germ free longer since you aren’t exposing it to air or germs from fingertips-spatula’s & so forth.
There isn’t a strong preservative used in this so even if you can’t see anything growing, it doesn’t mean there isn’t.
It’s vital to make sure all your tools are very clean so you don’t introduce germs into your mix.
Can you use magnesium flakes for added benefits? If so, how much and would I melt it with the beeswax and oil?
My daughter is allergic to aloe. Is there a substitute you could recommend for this recipe that I could use instead? She has terrible eczema, her finger tips and heels crack terrible so I am looking for a good remedy for her. Thank you!
Yes, you can use distilled water, floral water, or a strong-brewed tea in place of the aloe.
I’m interested in trying the tea. Is there one you prefer?
Betsy, may ’emulsifying wax’ be used? I’m finding that on the beeswax sites – in flakes, no less – and wondering if I could use it.
You can use emulsifying wax, which will work better than beeswax. However, the problem is that it’s not actually a natural product. It’s usually made from many synthetic ingredients, and often contaminated with the carcinogen 1, 4-dioxane. I would encourage you to do your own research on this ingredient and decide if it’s right for you!
Betsy, what do you think about the use of guar gum/xantham gum as a thickener, particularly for this recipe? Do you have any thoughts about the use of guar gum in cosmetic recipes?
I use guar gum in my body wash & conditioner recipes. For lotion that is still a bit runny after whipping it, guar gum may help thicken it right up. Thoughts?
Just made the recipe tonight and I found it to be very greasy. I had a very difficult time cleaning any of the tools used, because it was so greasy. When using water, I couldn’t even clean it anymore because it would slip out of my hands. I spent about 45 minutes blending and blending, trying to get it to become creamy, but it never did. I followed the directions, is there something I am missing?
It’s really hard for me to determine what went wrong without actually being there to see it. 🙁 What kind of oil did you choose? And you only used 1/2 cup of oil, right?
On the aroma spray it says distilled water can filtered water be used like the mouthwash?
Yes, filtered should be fine for the room sprays.
I’m a new Vitamix owner (and LOVE it). You said using the Vitamix is best. What setting should I put it on when emulsifying? (My Vitamix goes 1-10). And when cleaning it up, it’s ok to add salt? I hadn’t thought of that. I haven’t used it for anything non-food related yet and can imagine it being kind of difficult to get the blade area clean. Am excited to try this!! Have had emulsifying fiascos before so hopefully I can get this right!
BTW … Love your site. I unraveled a wool sweater and made the wool dryer balls. My father in law was visiting the other day and said his clothes have never been so fluffy or smelled so good (he used my DIY laundry detergent as well)..
Hooray for a new Vitamix!!! Just use the lowest setting (1) for most of the mixing, but then turn it up to 5-8 every so often to help emulsify. Just experiment to find what works best for your batch. 🙂 Be sure to constantly push the liquid back down into the blades and watch your mixture until it reaches a creamy state with all the liquid incorporated. (I stand on a chair to watch mine since the Vitamix is so tall. Lol.)
It’s perfectly fine to add salt to it for cleaning. I usually wipe mine out as well as I can, then add water, salt, & a little dish soap for cleaning.
Glad you’re loving the site! The wool dryer balls are fantastic, right?
Betsy – the wool dryer balls ARE awesome!! Totally recommend them putting that project to the top of the DIY list. Ok, so I tried it and it was pretty much a straight shot into the trash can. It wouldn’t emulsify. I decided not to use my Vitamix, which was total laziness on my part (have to make mayo today and didn’t want to wash it twice… I know… lame on my part.) Instead I used a hand mixer, which I’ve had success using with lotions before. No bueno. I put the aloe mixture in the micro to get it to the same temp as the wax mixture since it was solidifying rather quickly. What’s the consistency of your wax mixture at the point of combining? The first half of the mixing went great. Consistency was great and it was totally emulsifying, but the second half went downhill quick. I even added a bit of borax, which didn’t help at all. Do you think emulsifying wax would help? Of those readers who have had success with this recipe – any pointers on the emulsification process? If at first you don’t succeed… will be trying this again!
I’ve started blending when my wax/oil mixture was still pretty oil, and I’ve also done it when it was very close to being hard (and I don’t recommend waiting this long). That’s mysterious that it was emulsifying and then it didn’t work out. Hmmm. I wouldn’t recommend using emulsifying wax, which is not a natural product. However, if you do, you will not need beeswax in this recipe.
I have had success with this recipe with a hand mixer, but I really find the blender to be easier since the lotion is contained in a smaller area. Hope you have success on your next try!
I use baking soda/vinegar combo when I have to clean off anything that seems gunky/greasy. I would add that to your blender with a bit of water and then blend to clean.
hi betsy!
thank you so much for this recipe! of all the homemade lotion recipes i’ve tried, this is by far THEE best! :o)
my only thing is, it seems to be a bit “waxy” to me… it leaves a very little bit of a waxy coating on my hands when i rub it on. it’s like having a thin layer of butter smeared on your skin. when i went to wash my hands, the water beaded and ran right off my hands, instead of washing away the coating. is this from the beeswax, do you think? would it be wise to cut the about of beeswax in half, to see if that helps? i also added about 2 cups of distilled water (in addition to all the ingredients listed above), b/c while i like a “heartier” lotion, what i’m really after is a thinner lotion, not a butter… something in between would be perfect.
any suggestions you could offer would be so very appreciated!
thank you again! this really is pretty wonderful stuff!
Yeah, this is most likely due to the beeswax. A little bit of the lotion goes a long way. Perhaps you’re using too much? Try using less, and if you still don’t like the texture you could decrease the beeswax in the recipe. Glad you like it other than that issue. 🙂
well I messed up big time so need to know if there is anyway to fix.
On the beeswax I was thinking half a cup equals 4 oz, so I took 4oz of beeswax and guess what I have hard as rock lotion LOL
then i read half a cup grated in someones comment is about 3/4 oz…
anyway I can fix this by melting it again and adding more oils??
I would not melt it again. If it’s hard as a rock, just use it as a lotion bar! You can keep it in a container and rub it on your skin. Your body heat should melt it as long as you don’t have too much beeswax. Give it a try!
The only aloe vera gel I could readily find in Toronto, Canada is Lily of the Desert. It contains carrageenan (thickening agent) and, as a result, was impossible to pour slowly. Is this the reason why my cream is taking so long to emulsify? I’m getting there, but I’m at almost one hour at this point and my blender is heating up!
I used the same brand when I made mine a few days ago (99% aloe vera Gelly) and it turned out. I did not let the oils cool very long though…impatience 🙂 Possibly that helped. As soon as I put the aloe in it turned into a big clump. I had to constantly turn it off and push down the cream to get it to stay down in the blades. It did not take very long to emulsify, either. Another difference for me was that my blender does not have a low speed, just fast and a little faster. The cream is a tad gooey, but has a wonderful feel if you get past that.
Hmmm, how did you get the aloe mixture to pour slowly? I did read on another site that the (grapeseed)oil/beeswax should be “room temperature” so I thought maybe that could have been my problem as well as I was rather impatient too. I started out using my immersion blender but got tired of holding down the button, then switched to my 2-speed (fast and faster) blender after about 20 minutes. After letting my blender cool down I did get about 95% of it to emulsify… it is initially a little greasy but it does sink in nicely.
It didn’t poor slowly. It just kinda glopped in all at the same time.
I’ve been wondering, what’s the purpose of the beeswax?
The beeswax is the natural emulsifier.
If you purchase a good quality PURE aloe vera gel, it will only contain a little citric acid to preserve it, and it will be thin and pourable. Many brands add carrageenan to thicken, which makes it thick and goopy. Mountain Rose Herbs sells a nice pure aloe vera gel that has a pourable consistency.
I have done the different speeds, it does not help. I scrape it and mix the liquid and that does not help. All my ingredients are room temp. I don’t put my aloe in the refrigerator. It does not state to do that once opened so I leave everything at room temp. I am thinking maybe trying adding less aloe vera and seeing if that works.
Yes I kind of have qualms adding borax to the mixture. There is nothing else that can help???
I really recommend using a blender for this. You may need to turn the speed up on high a few times, scrape down the sides, turn it on low, push the liquid carefully toward the blades, turn it up on high for a few seconds, etc. This is the way I got mine to emulsify. Lots of patience, moving the liquid around so it hit the blades, and changing the speed on the blender a few times. Making lotions and creams is a very tricky art…don’t be discouraged if end up with a bum batch! 🙂 It took me about 3 messed up batches to get this recipe just right.
Just checking…are all your ingredients room temp before you start adding the aloe mixture to the wax/oil mixture? This is very important for the success of the emulsion. (I have had problems with this because I take my pure aloe vera gel out of the refrigerator and I’m too impatient to allow it to warm to room temp.)
I’ve been trying to get away from plastic stuff.
I’m going to buy different glass jars.
I noticed the jar for this cream is blue.
Do you need a colored jar for this?
I always try to use glass when storing a homemade product that contains essential oils because they react with plastic. It’s best to use amber or cobalt glass since essential oils also degrade when exposed to light. If using clear glass, just be sure to store in a dark drawer or cabinet.
I tried this recipe the first time with a hand held blender and it did not turn out-was hard. I still used it but got quite the workout just trying to get it to blend into my body. The second time I used a 5 speed blender and cannot get the liquid to go away no matter how long I do it. I have read all the directions and the comments and to no avail. It is nice and creamy but watery. I even tried dumping the excess liquid out but the lotion is still wet when I apply so I end up itching because the water dries with the lotion and makes me itchy. I really like this recipe because when it is rubbed in, it is nice and nourishing but am getting frustrated because I cannot get it to turn out. Help.
If you don’t have qualms with adding a pinch of borax to the mixture, I assure you this will help it emulsify in a heartbeat.
Hi Betsy,
Thanks for this recipe–looks wonderful. Can I squeeze shea butter in the recipe anyway ie instead of all oil, can I mix 1/2 jojoba and 1/2 shea butter or some ratio like that. The reason I’m asking is because my son’s skin is very dry and even homemade body butters don’t seem to nourish his skin fully (i.e. shea butter, coconut oil, olive oil etc). He also has eczema.
The other question I have is can i use aloe vera gel straight filleted from the leaf for this recipe? We have a plant at home that I can use.
Thanks in advance.
You could definitely use some shea butter in place of the oil in this recipe. A half & half ratio would probably work well. You can also use your fresh aloe. Have fun with this project!
For your son’s dry skin, just a suggestion: kids hate drinking water, I know, but is he drinking enough water?
Hi Betsy,
I have some 99% aloe vera gelly. Do you think that would work? Or, I also have a bottle that says pure aloe vera, but it is not a gel…it is very liquidy. I’m enjoying getting into making all these natural concoctions. : )
Thanks for all of the information you share.
Pure aloe vera gel is very runny and pourable. Use your pure aloe vera.
Do you buy the beeswax in the pastille form or the solid form and then grate it? I’m guessing the latter. But wondering because the website you direct us to offers it in a 1 ounce size and then by the pound. How much would I need to get the 1/2 of grated beeswax? Or of the pastilles to melt?
thanks! can’t wait to try this and the moisturizing spray!
I purchase mine in solid form and then grate. If you buy pastilles you will not need to grate. You’ll need about 3/4 ounce to get 1/2 cup of grated beeswax if you buy it in solid form. Same with the pastilles…you’ll need about 3/4 ounce. Hope the recipe works out for you!
Try as I might, I could NOT get this to emulsify. I blended for hours, let rest for a day and tried blending again It was a thick beeswax mess. Any suggestions??? I love the idea of the simplicity of this recipe and would love to see it work. I used aloe vera juice, beeswax granuales, and almond oil, lime and peppermint essential oils and vit. E, I could not find borax locally so I tried a little boric acid after blending for about 2 hours.
Boric acid is extremely toxic, and I would not recommend using it in your homemade lotion. It’s not the same thing as borax. However, your lotion should not have to blend for hours…10-20 minutes should do the trick. As long as you are constantly pushing the liquid down into the blender blades. I never walk away from the lotion as it’s blending, because it needs to be helped along continuously during the blending stage. Unfortunately, I would recommend tossing this batch because the boric acid is not safe for use in personal products.
I did toss it, my garbage smelled delectable! As I reread your instructions, I did allow my oil/wax mixture to completely harden, maybe this was my error. I will definately try again!
Yeah, once the oil/wax mixture completely hardens it can still be done, but it makes it a lot more labor intensive. Just be sure to tend to the blending mixture the whole time, stirring the liquid parts around, etc. Good luck with the next batch!
I bet it is because you used Aloe Vera Juice, not Aloe Vera Gel. Juice will be too watery to emulsify.
Do you have a weight in ounces I could use for the beeswax amount versus the measurement? I have a bar of beeswax an have a hard time grating it down enough to get an accurate volume measurement. Or do you have suggestions for easily grating a bar of beeswax? Thanks!
Yeah, grating beeswax is a pain. I have a designated hand held grater for this purpose. I like it grated though because it melts soooo slowly if it’s in big chunks. If you want to use bigger chunks though, you’ll need about 3/4 ounce of beeswax.
Argh, this was a disaster! It separated and made a huge mess in my kitchen. I’m using it anyway, but the liquid drips off onto the floor and the chunkier oily parts don’t dissolve well. What did I do wrong?!
The trick is to continue blending until completely emulsified and creamy. It might take longer than you expect. You’ll need to stop the blender several times to move around the liquid so it hits the blade and is blended with the chunkier oily parts. If you stop blending prematurely you’ll end up with a chunky consistency. Don’t throw it out though, you can put it back into the blender and try for a better lotion consistency.
I’d love to give this a try but I would be reluctant to use my food blender. Maybe I should get a stick blender just for cosmetics.
I bought a stick blender and could not get it to work properly with these ingredients. So I am buying a separate blender just for the cosmetic stuff (glass tho of course because it is really hard to clean even with glass so I can not imagine trying to clean a plastic blender.
Great-looking recipe! I can’t wait to try it. Do you think I could accomplish the same thing using a hand-held mixer instead of a blender? Thanks!
Absolutely!
Would this work with coconut oil?
You can use coconut oil in this recipe, but it will no longer be “non-greasy.” 🙂
According to the Environmental Working Group, household cleaners containing sodium borate are dangerous because they are endocrine disruptors. I wouldn’t use sodium borate in cream that would be absorbed into the skin. I have used Borax for years as a natural cleaning product, but was shocked to see the failing grade it got from EWG.
If you look closely at the sources the EWG used to make this determination, borax and boric acid are lumped together in some of the studies used. As you probably know, boric acid is very dangerous. That being said, I only recommend using the pinch of borax as a last resort since it will emulsify without it if you are patient. And a “pinch” of borax within an entire batch of lotion is not likely to do any harm.
Boric acid has been used for decades as a weak eye wash. I don’s see it as being toxic at all. Now BORAX, that is possibly another matter, as I have heard SOME concerns for using it, even in cleaning applications… I personally have no issues with using either.
Can this be used on your face too?
Great question Nancy. It’s just a matter of preference and how thick you like your facial moisturizer. I usually use straight jojoba oil on my face, but this particular cream would be really nice as a facial moisturizer for mature skin.
Why does it need to be refrigerated if not used all the way by two weeks?
Please check the information under the “Notes” section regarding shelf life. 🙂
I was wondering if you could use Camelina oil for this?
I don’t see why not! 🙂
I’m an old guy, 65. I appreciate this. I will use it for face cream.
Thank you for all you do!!!
Can’t wait to try it. I have a recipe that I love and it absorbs quickly into my hands since they are so dry but it lingers on my body and stays greasy. I will try this one for body cream. Thanks!
It’s great as facial moisturizer too!
Can I use the borax I find at WalMart?
I have used regular borax in this recipe before, and it came out very nice.
Borax? I don’t see it as an ingredient in this recipe. ??
Never mind… I had to reread the whole thing to find the reference: “You can add a pinch of borax to the mixture if you’re really having trouble getting it to emulsify.”
LOL
I am so excited to try this. I have a thyroid condition that makes my skin so dry it cracks open, and I am allergic to all petrolatum/petroleum products! You would be surprised how many lotions contain this. Thanks!
Oh, you’ll love this lotion Valerie!
Sounds great thanks for sharing! will give it a try!
When do you add the sweet almond oil? Do you add it with the aloe vera gel?
Hi Gail,
Your sweet almond oil should be melted with the beeswax in Step 2, then added to the blender in Step 3.
Betsy, do you think a stick (immersion) blender might work for the blending part. It’s what I have on hand. Also can peeled aloe gel right from my plant be used , if blended up before adding. It can be a bit slimy and foamy when first blended in that natural state. Thanks.
I have made a similar recipe 4 times now that I read off another blog and I believe that using a stick immersion blender is key to getting it to turn out. I also recommend that your aloe vera gel must be at room temperature and to let the oils cool as much as possible to a thick gel like consistency before adding the aloe vera gel. When I didn’t do these recommendations, my cream separated big time.
Yes, I have used a stick blender for this recipe, and it works fine. I have not used fresh aloe in this lotion yet, but give it a shot!
How much does one batch of this cream cost?
I would like to know the answer to this too! If one has to buy all the ingredients (since I’m just getting into the DIY lifestyle), how much will the initial cost be, and approximately how much does one batch cost?
Thanks so much for your great information & recipes!
I haven’t done the math, but it really depends on where you get ingredients, and which specific ingredients you choose to use (since there are alternatives listed for some of the ingredients). I have ingredients from all over the place that I used in this recipe, but if you add up the prices for the products recommended, you could figure out how much it would be if you purchased all the ingredients brand new.