
Learn how to compost quickly. Making compost at home is simple and you can do it fast to create healthy, organic soil in just 30 short days.
With the heat of summer upon us, most of us are thinking about picking beans, roasting corn and canning tomatoes. It’s been really wet in parts of the country this year, and these crops aren’t doing as well because all the rain is diluting the nutrients in the soil. How can you give your plants an extra boost? With compost. Don’t have months, or even years, to wait for it to form? You don’t have to!
Composting is a simple process. It involves dumping your vegetable and fruit peelings, coffee grounds and egg shells along with grass clippings and twigs and leaves. After six months to three years, you have a rich, crumbly dark brown substance that will give your plants all sorts of nutrition. But often times we don’t have the time (or patience!) to wait that long. Now there’s an easy way to make compost in 30 days or less.
How to get compost – FAST
Setting up your own composter
Of course you could go out and buy yourself a compost tumbler for $100-$200 or more. It will do the job, but there’s a plan that’s easier and much cheaper that you can do yourself.
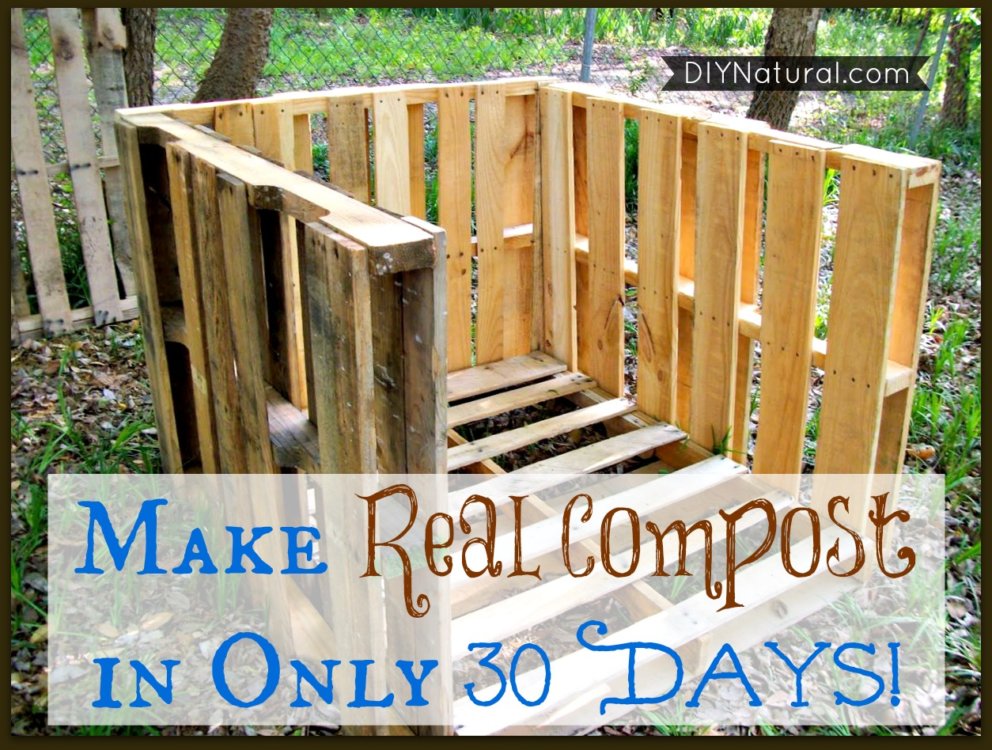
First you’ll need to obtain four pallets. You can usually get them free from grocery stores or home improvement stores. You might have to pay a few dollars, but it’ll be worth it. Be sure the pallets you get are clean, without any grease or any substances on them that could leach into your compost.
Once you have four pallets, use one for the base and three around the sides and back in a U shape. Bind them together with wire, rope or zip ties. Don’t do anything permanent – you’ll be removing them later. If the base has large gaps, you might want to add a few boards to make a “floor.” Be sure to leave some space between, like ½ inch or so, for air circulation.
Materials to be composted
Once you have your bin set up you can begin adding the composting material. You want a ratio of about 1 part “green” material to 2 parts “brown” material.
The green material can be:
- fresh grass clippings,
- manure,
- leaves,
- fresh hay,
- or household kitchen waste, such as vegetable peelings.
(Don’t worry about weed seeds – once the internal temperature of the compost hits 155° for three days, it will kill the weed seeds.)
For the brown material you can use:
- straw,
- dead leaves,
- twigs or yard weeds that have been wintered over.
Now, here’s the part that will speed things up. Everything you put into your compost bin should be no larger than 1-2 inches in size. And all household kitchen waste can be put in a blender. This will speed things up considerably since it will not take time for it to break down naturally.
Filling the compost bin
Premix the brown and green material together. Then set up a 3 inch layer on the bottom of the bin. Add a few sticks so there will be air circulation. Then add another 6 inches of material, then more sticks. Keep doing this until your pile reaches the top of the bin. If you don’t have enough material, go at least 3 feet high.
After you get your brown and green material in the bin in layers with the sticks, wet it down well. Don’t saturate it, just make it similar to a damp sponge. You can also add a few handfuls of lime, but I’ve never had to. You don’t need to add a “compost starter,” but you can add some aged compost or garden soil. This will provide beneficial bacteria and fungi to kickstart your compost.
If you use this method, you won’t need to turn your compost at all. Alternatively, you can omit the sticks between the layers and turn the pile occasionally. This will provide the necessary aeration. The pile will get very hot, 140° to 160°. If you don’t provide aeration, it could get hotter than 160°, which will kill the good bacteria. Essentially, you’ll need to start over. Temperatures of 155° will kill most plant diseases as well, but it won’t kill heat resistant diseases like tobacco mosaic virus. And it won’t be hot enough to kill pathogens found in meat products.
Other tips for creating great compost
On that thought, here are a few things you shouldn’t compost. Meat and bones are no-no’s. Glass, plastic, fatty substances, metal, rubber, pet waste and anything that may contain chemicals such as clippings from herbicide-sprayed lawns.
Some things I never thought of but that can be composted are junk mail (with any plastic windows removed), cardboard and cereal boxes. Most cardboard manufacturers are using soy-based inks and natural adhesives, but you might want to check before you use them. Newspaper is also great. All of it in our area is recycled paper and soy-based ink. Again, you might want to check with the printer. Cut, shred or tear junk mail and newspapers into small pieces to get them going faster too.
Another thing you can do to speed things up is add some worms. (Read more about vermicomposting with worms here.) Red wigglers are about the best to use, but common garden worms and night crawlers will work just as well. These little creatures multiply quickly, regenerate if damaged, make fast work out of scraps and aerate the compost too. And when you’re done, you can use them for fishing bait!
Composting is an old time-honored tradition of slowly making nutrients for your soil out of waste materials. But it can be quick, too!
*******


I’d love to know how to reduce this recipe 😉 I garden in containers (city dwellers) but used to do it on a large scale basis when we were in the country. I have a countertop composter, but frankly, its main function was as a holding cell until it could be walked out to the main pile. Is there a way to make something that is 12x12x12, or is that too small to even get the job done? Thanks!
I love that this process can be done in only 30 days!! Using the kitchen blender to speed up the breakdown process is a great tip.
I’ve got this post scheduled to share on Facebook Monday evening. I think YGF readers will love it.
Any chance of some additional photos?
THANKS!
I think our followers will like this simple way to get compost started. I’m going to put it out there and see what they think. If you are a ‘pure’ organic gardener, printed paper is not a good thing. However, newspaper and mail (avoid glossy paper) can be shredded and worked into the soil when you get ready to put the garden to bed for the winter. It will decompose over the cold (midwestern) months and add more tilth to the soil.
Thanks Jackie! And again, it’s not what i would recommend for most areas, but the newspaper and a lot of the mail we get is naturally based, so it would ok for your garden. I never put any of my beds to sleep for the winter, but keep rotating them. As I prep them for the next crop, I add compost that has been going for a while. Since most people don’t do it this way, adding these things in the fall would be a great help.
Great article! If you’re trying to keep an organic garden, I would not use paper, cardboard or printed anything. The soy based ink would be a big no-no in an organic gardening since soy is one of the top GMO crops.
I stick to kitchen scraps, lawn clippings rich with clover, other backyard garden waste, and my hens’ litter.
Thanks Nicole! I don’t normally recommend it either, but since I know the local printers use natural paper and soy based inks, it’s far safer than some things out there.
And…the ink used by a lot of printing companies is organic. A lot of them won’t use soy that has any problems, including GMO’s. I 3would check with the printer before using it if I were concerned. Many companies now provide printing information, including % recycled and so on, at the bottom of the publication.