
Recently I shared some ideas on how to make more plants from your existing plant cuttings. Today I wanted to touch on how to root plant cuttings you already have.
In another week, many of my plants will be sending out new, green growth and it will be time to make cuttings. One of the plants that we would really like to have a lot more of is lavender. We already have a pretty large planting so instead of paying $40 or more per flat from someone else, I’m going to go out and give my established beds a trim.
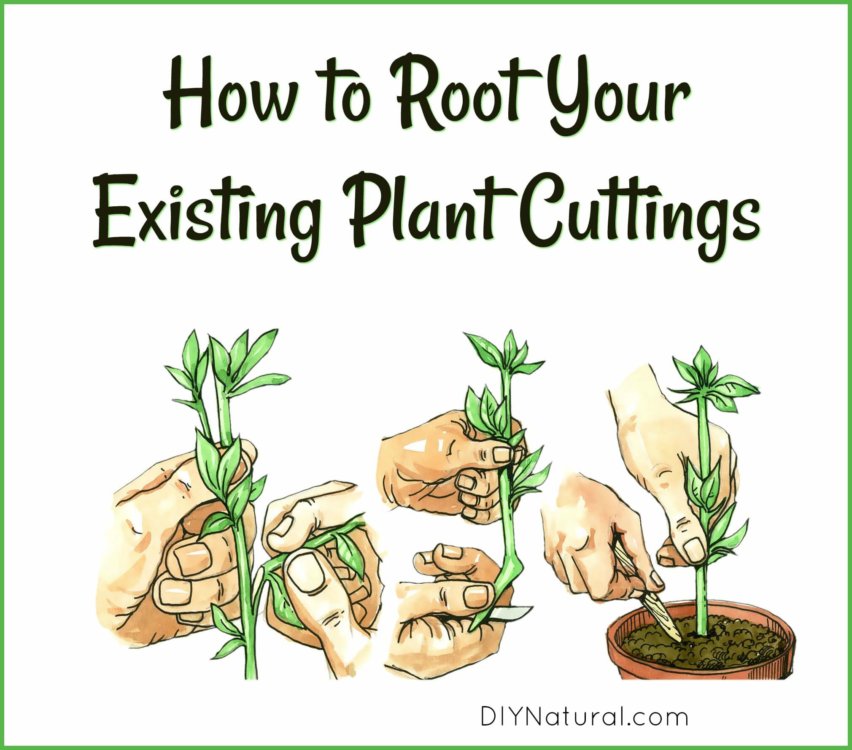
How to Root Plant Cuttings
Cuttings are typically taken either in the spring or fall. Lavender is said to be best to take in the fall, but late spring will work as well. I’ll be picking the shoots that are firm – not the delicate, brand new growth. I’m looking for an established branch of the lavender that is still green and not woody.
Step 1
The first step will be to cut about a six inch shoot of the plant with a pair of very sharp and very clean clippers. I will try to choose a shoot that isn’t trying to flower. If I can’t find one, I’ll remove the flower before the next step.
Step 2
Next I’ll trim off all but one or two sets of leaves near the top of my shoot. I’m removing the unnecessary leaves and flowers because I want this new plant to devote all of its energy to developing roots rather than continuing to feed leaves and make flowers.
Step 3
I’ll prepare a soil mixture that is about ⅔ potting mix and ⅓ sand. I want the soil to hold moisture, but not become waterlogged. Each stem that is prepared to this point will be dipped into a rooting compound and then placed directly down into the soil of a plastic greenhouse tray or takeout container. At least 2 of the ”nodes” where the leaves were cut off before planting will need to be below the surface of the soil. This is where the new roots will develop.
Step 4
Finally, I will place a plastic tray cover or a plastic bag over the whole container. When making cuttings you want to keep them evenly moist and warm until they begin to sprout roots.
After a few weeks, I’ll gently pull upwards on a few plants. If they give easily, they need more time. If they provide resistance to my tug, they are well on their way to establishing a new root system and it won’t be too long before I can set them out in their new rows.
Natural Rooting Compounds
When learning how to root plant cuttings, it’s important to use a rooting compound. You can buy one from the store, but they contain chemicals that you may not like to have in your vegetables or herbs. Instead, there are a number of plants that may already be growing in your garden that can help you out. Here are a few of them to get you started:
Honey Tea
Add a spoonful of honey into a cup of warm water and allow it to dissolve. Spritz, water, or soak your cuttings in the tea for best results.
Comfrey Tea
If you have comfrey (Symphytum spp.) in your yard, you can make tea from any part of the plant. Use this as your rooting compound.
Willow or Cottonwood Tea
Willow (Salix spp.) or cottonwood (Populus spp.) tea can be used interchangeably and might be the most commonly used for rooting. To make, cut new spring growth (green or yellow shoots only) into short lengths and soak them in warm water for 48-72 hours. Take your cuttings and soak them in the willow tea for several hours or overnight. If that is not possible, you can use it to water the soil where you’ve planted your cuttings at least twice. Willow tea can be kept up to 2 months if tightly sealed and refrigerated.
Hope you enjoyed my tips for how to root plant cuttings, and happy cutting!
*******